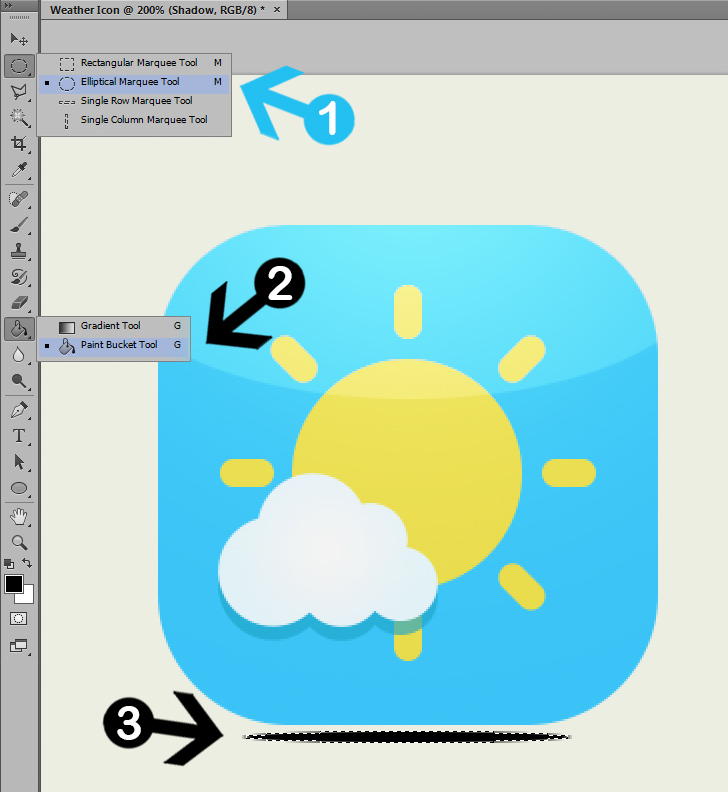
In this Photoshop tutorial, we will learn how to create a simple weather icon using Adobe Photoshop CS6+. No special techniques or Photoshop skills are required to make your own weather icon. You can use the same technique to create a similar vector icon using Adobe Illustrator.
Tutorial Details
Difficulty: Beginner
Apps Used: Adobe Photoshop
Estimated Completion Time: 10-15′ Minutes
Step 1 > Create a New Document
Create a new Photoshop document. For this tutorial, I used 800px width and 400px height.
![]()
Step 2 > Background
You can go straight to the icon but I filled the empty background using Paint Bucket Tool (G) and #ebeee1 colour.
![]()
Step 3 > Base
To create the icon base change the foreground colour to #3bc3f6 and pick the Rounded Rectangle Tool (U). Press left-click on your document and set 250px width, 250px height and 65px Radius. To align the shape in the centre of our background press (Ctrl + A) and then the “Align vertical/horizontal center” buttons from the top toolbar.
![]()
![]()
Step 4 > Sun
To create the sun, first, create a new layer and then pick the Ellipse Tool (U). Draw a small circle with #e8db4b color.
![]()
Step 5 > Sun Rays
To create the sun rays, create a new layer and draw a small rounded line with the Rounded Rectangle Tool (U).
Next, go to Layer > Duplicate Layer and move the new duplicated ray to the other side. Press (Ctrl + E) to merge the sun rays. To create more sun rays, duplicate the sun rays by going to Edit > Transform > Rotate 90° CW.
Next, merge the rays by selecting them and pressing (Ctrl +E) on your keyboard. Finally, press (Ctrl + T) on your keyboard and rotate the sun-rays 45°.
![]()
Duplicate the rays and rotate them by 90° CW.
![]()
Duplicate again the rays and rotate them by 45°.
![]()
Step 6 > Cloud
To create the cloud, press (D) on your keyboard to reset to default colors. Create a new layer and pick the Rounded Rectangle Tool (U).
Draw a small circle and duplicate it several times (Layer > Duplicate Layer). Change the size and position of circles to make them look like a cloud (image b).
Select all the circles and press (Ctrl + E) to merge them into one layer.
Next, go to Layer > Layer Style > Blending Options. and add the following settings:
Create a small circle
![]()
Duplicate the circle and change the size and position several times.
![]()
Add Drop shadow with these settings: Blend Mode: Normal, Opacity: 65%, Distance: 7px, Size and Spread: 0px, Color: #1da3c7
![]()
Add Gradient Overlay with these settings: Blend Mode: Normal, Opacity 100%, Color: #def1f6 to #f2f2f2 gradient, Style: Radial.
![]()
Step 7 > Highlight
Create a new layer and rename it “Highlight 1”. With Highlight 1 layer active, press (Ctrl + Left click) over the layer to load the selection. Pick the Brush Tool (B) with white color, 300px size, and 0 hardness.
Paint over the selection and press (Ctrl + D) to deselect. Change the blending mode to Overlay and opacity to 90%.
![]()
Step 8 > Another Highlight
To create another highlight, create another layer and name it “Highlight 2”. Pick the Elliptical Marquee Tool (M) and draw a rounded selection. Fill the selection with white color using the Paint Bucket Tool (G).
With the “Highlight 2” layer still active press (Ctrl + Left click) to load the selection.
Next, go to Select > Inverse to invert the selection and then hit (Delete) on your keyboard. Change the blending mode to Overlay with 30% Opacity.
Draw a rounded selection and fill it with white color.
![]()
Invert the selection and press Delete on your keyboard.
![]()
Step 9 > Create a Shadow
To create a shadow pick again the Elliptical Marquee Tool (M) and draw a small rounded shape under the icon.
Fill in the new layer with black colour and press (Ctrl + D) to deselect your selection. Go to Filter > Blur > Motion Blur and change the distance to 100 pixels, the angle to 0.
Next, go to Filter > Blur > Gaussian Blur and add a 2,7 pixels radius. Move the shadow layer under the “Base” layer and change the blending mode to Linear Burn with 25% Opacity.]
Draw a small rounded shape and fill it with black colour.

Add Motion Blur with 100 pixels distance
![]()
Add Gaussian Blur with 2,7 pixels Radius and press OK.
![]()
Conclusion
If you like flat icons over glossy ones, then simply skip Highlight 1 and Highlight steps.
To save the icon with a transparent background hide the background and save it as a PNG.
![]()
15,000+
Design Assets
- Instant Access
- Free Content Updates
- Constantly Growing Library
- Unlimited Downloads
- Simple Licensing


By Dreamstale
Get creative with our free & premium design resources. Download a vast collection of graphic design materials, such as graphics, sublimation designs, icons, textures, stock photos and more.
Plus get access to Photoshop tutorials & inspirational articles that will spark your imagination.


